|
Tracking is an age-old art . . . and one that's been
pretty much forgotten in modern times. The finely honed skills
that native Americans once used to sustain and protect
themselves have been — in the eyes of many people — rendered
unnecessary by supermarkets and government-provided security.
However, the ground still has a wealth of stories to tell
those who'll take the time to learn to read it. Imprinted upon
the earth's surface is a manuscript that's written and
rewritten every day . . . recording the movements of raccoons
and squirrels, the foragings of deer and elk, and the daily
dramas that make up the lives of other residents of our
forests and fields.
Of
course, as is the case with almost any avocation, it takes
years of dedication and practice to become an expert
tracker
. . . but anyone can become more sensitive to the flow of
animal life by simply learning to recognize the basic signs of
its passage. Furthermore, it isn't even necessary to enter the
wilderness to study tracking. In fact, most of the essential
skills can be learned in your back yard or in a city park.
Your own dog or cat can teach you a wealth of lessons that
will give you a deeper understanding of — and
interrelationship with — the great outdoors.
RECOGNIZING RELATIVES
Learning to track is like learning to read: Before you
can begin making out meaningful words, sentences, and
paragraphs, you have to know the alphabet. And the ABC's of
tracking are the distinctive prints of various species of
animals. It's usually possible to determine the family to
which the owner of a given track belongs by doing little more
than counting the number of toes in the footprint. Then you
can determine the creature's species, by examining foot size
and other features, with the help of a reputable guidebook.
(Olaus Murie's A Field Guide to
Animal
Tracks
— Peterson Field Guide Series, $9.95 — is one of the best.) To
help get you started, though, here are the track
classifications for the most common families of animals.
The felines include the house cat, bobcat, lynx, and cougar. These beasts
leave very rounded tracks, with four toes apparent on each
foot but no claw marks (their claws are usually retracted).
The cats are the only family of animals that
directly
register when they walk . . . which means that a hind foot
usually falls directly into the print made by a front foot,
creating what appears to be a single track.
The canines include dogs, foxes, coyotes, and
wolves. These animals' front and rear feet also have four toes
each, but the claw marks are typically visible in canine
prints. The fox is the one member of the dog family that
directly registers when it walks. All other canines show
indirect
register . . . meaning that the back foot's mark
falls slightly behind and to one side of the front print.
The weasel family consists of martens,
fishers, minks, ferrets, skunks, otters, badgers, wolverines,
and (of course) weasels. Prints made by these mammals show
five toes up front and in the rear, and usually
reveal sharp claws. Many members of the weasel family also
have very pungent scent glands and leave an acrid smell
wherever they go (the skunk is merely the most famous
example). So use your nose when you investigate unknown tracks
or animal signs.
Raccoons, opossums, and
bears are not in the weasel family,
but they do have similar clawed five-and-five tracks. All
three of these animals, though, have very flat, humanlike feet
. . . and the opossum has distinctively opposing thumbs that
are used for climbing.
The rodents include such gnawing mammals as voles, mice, rats, squirrels,
chipmunks, gophers, porcupines, muskrats, and beavers. Their
tracks show four toes on each front foot and five on the rear,
with three exceptions: Beaver and muskrat leave five-and-five
prints some of the time (often the fifth toes don't
make visible impressions), while aplodont — or mountain beaver
— marks show five and five all the time.
Pika, hare, and rabbit
family
members are not rodents, in spite of their chisellike gnawing
teeth and often similar size. Their tracks show four toes up
front and in the rear, and generally (except for those of the
marsh rabbit and the pika) the back feet leave impressions
that are at least twice the size of those made by the front
paws.
The hoofed animals
are easily recognized by their one- or two-part
heart-shaped prints. This group includes pronghorns, goats,
sheep, deer, caribou, musk ox, moose, reindeer, and elk.
|
|
|
|
|
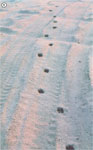
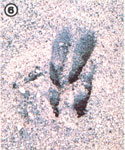
[1]
Deer tracks reveal the animal's typically diagonal
walking pattern. [2] A rabbit's-eye view of a well-worn
small mammal trail. [3] Beaver chew marks on an alder
tree. (PHOTOS BY TOM BROWN
JR.) |
TRACK PATTERNS
Once you've learned the tracking alphabet, you'll be
ready to start reading the "words" . . . that is, the simple
statements made by animals as they pass over the landscape. As
you'll soon discover, tracking involves more than merely
following an animal from one place to another. When
done well, it's a process of answering a continuing series of
questions about a beast and its interactions with the
environment. It's important, then, to familiarize yourself
with the various track patterns of animals, in order to read
the thoughts and intentions that might have inspired the
movements recorded on the ground.
Animals are no more eager to wear themselves out
needlessly than humans are, so they usually walk or shuffle
from one place to another. Therefore, the vast majority of the
tracks you find will indicate an animal moving at or near its
slowest gait. And there are four distinctive walking patterns
that you'll have to learn to recognize and to
link up with
specific families of creatures. Once you're familiar with
them, you'll be able to see how these same gaits are used by
different animals at different speeds.
Diagonal walkers — like the cats, dogs,
and hoofed animals — lift front and hind feet on opposite
sides of the body at the same time, alternating sides as they
go. This movement leaves a staggered set of tracks. At
progressively higher speeds, diagonal walkers often move into
trotting, loping, bounding, and finally galloping patterns.
Bounders include members of the weasel
family (except for the wide-bodied shufflers . . . such as
skunks, badgers, and wolverines). These animals hop in a
series of "stitching" jumps in which the front feet come down
first and the back feet pull up right behind them. Bounders
maintain this pattern most of the time regardless of speed
(though the "stride" increases — that is, the jumps become
longer — when the beast hurries).
Gallopers are animals — such as rabbits — that
hunch their bodies even more than do bounders . . . bringing
their hind feet down in front and to the side of the front
paws. This gait usually creates an easily recognized U-shaped
track pattern. If the prints of the two front feet regularly
lie side by side, the track probably was made by a
tree-dwelling creature — perhaps a squirrel — while a
consistent pattern of diagonal front-foot marks indicates a
ground-dwelling animal, such as a rabbit. (Incidentally,
tree-dwelling and ground-dwelling bird
tracks can generally be
distinguished in a similar way. Arboreal "hoppers" leave
parallel prints, while "walking" birds stroll on the bias.)
The speed of a galloper can be determined partly by the
increasing distance between sets of tracks.
Pacers include such wide-bodied animals as
raccoons, opossums, bears, beavers, porcupines, wolverines,
badgers, and skunks. These beasts usually move both feet on
one side of the body at the same time in a shuffling or
lumbering fashion. As their speed increases, the broadbeamed
members of the weasel family — wolverines, badgers, and skunks
— progress from pacing to bounding. Other pacers,
though,
often move first into a diagonal trot, then into a bounding
lope, and finally into a full gallop.
ANIMAL HIGHWAYS AND HOMES
Footprints are only one of the groups of animal signs
that an experienced tracker reads. In fact, an astute nature
observer, realizing that almost every facet of the surrounding
environment can contribute to the understanding of a track,
tries to interpret the entire landscape. For example, animals
create a wealth of thoroughfares, as was pointed out in my
article on survival traps (see MOTHER NO. 74, page 70), and
many of them are much like our own highways and side streets.
The most obvious routes are the trails . . .
well-worn paths that are generally used by a wide variety of
species. Runs are less noticeable
pathways that connect trails to feeding, bedding, and watering
areas. Usually these will be traveled by only one or two kinds
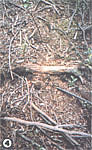
of animals and are subject to constant change. Pushdowns are
the sudden
escape routes indicated by vegetation that has been crushed in
one direction. Beds are habitual sleeping
spots, sometimes lined with fur or other debris. They often
appear as well-used depressions in thickets, grasses, and
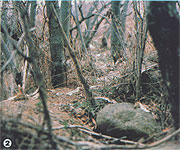
hollow logs or under rocks. Lays are less-frequented
resting spots, typically near feeding or watering areas. They
are indicated by depressed vegetation and will often show the
outline of the animal.
You're most likely to find these highways and homes on
the edges of forests and fields . . . in the transition areas
that offer abundant food, water, and cover.
|
|

|
|
|
|
[4]
Twigs worn by regular animal passage. . . [5] These fox
prints show the pressure released caused by the animal's
making a sharp turn . . . [6] Deer tracks, demonstrating
the indirect register of the front and rear feet. [7] A
rabbit lay . . . note the rough outline of the animal's
body. (PHOTOS BY TOM BROWN
JR.) |
OTHER ANIMAL SIGNS
As
you're tracking, keep in mind that animals leave a whole
host of clues as they pass over the landscape. Look
for rubs and nicks . . . those bare spots on branches and
trunks where animals have scraped themselves either
intentionally or accidentally in passing. Study scat (animal
droppings), because it can tell you a great deal about what a
creature has been eating. And always examine likely areas to
see whether you can detect scratchings or hairs.
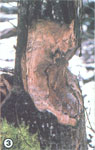
You may also discover obvious signs of gnawing such as
the substantial marks left by a beaver on a tree trunk.
Remember, though, that every piece
of gnawed
vegetation — even tiny twigs and grasses — can help you
decipher the signature of a specific animal. Rodents and
rabbits slice through greenery with a clean diagonal cut,
while hoofed animals clamp down and yank upward, a motion that
produces a flat, serrated cut. On the other hand, members of
the dog and cat families chew on vitamin-rich grasses
and herbs, leaving those plants with a crushed or mashed
appearance. Of course, the height of any gnawing will indicate
the size of the animal (standing on either four or two feet)
that made it.
FOLLOWING TRACKS
Naturally, the best places to begin tracking are areas
covered with wet sand, soft mud, or new snow. Beaches, creek
beds, plains, and desert areas are usually excellent learning
spots, since tracks made in soft earth are typically quite
distinct and easy to read. If no such area is readily
available, you can study the basics by making a tracking box
filled with wet sand, or by smoothing out a section of soft
soil in your garden or back yard. Put a variety of bait on the
"track trap", and then study the prints of the creatures that
it attracts.
A
tracking stick is an
especially useful self-teaching tool. It's simply a smooth,
straight 3- to 4-foot length of dowel — or a ski pole — fitted
with rubber washers or bands that can be moved to divide the
tool into sections. Use the first marker to indicate the
length of a footprint . . . the distance between the first and
second, the animal's stride . . . and the space between the
second and third, the width
of the
foot. Once you've found a good track, set these measurements
on your stick, and you'll be able to more easily identify your
animal and predict — if you're in difficult terrain — the
approximate location of its next track.
Whether or not you're using a tracking stick, there are
some basic procedures that will improve your ability. First,
keep the track between yourself and the source of light, as
doing so will make it easier for you to see the shadows in the
footprint. And for the same reason, it's best to track in the
early morning or late afternoon, when the sun's rays hit the
ground at an angle that makes the shaded prints pop out more
clearly. Also, be sure to get down on all fours and examine
the track from different angles. Vary the focus of your vision
to see how the track fits into the total environment. And use
side-heading . . . that is, get one eye as close
to the ground as possible and squint the other eye when you
scan the earth for signs. (This technique is especially useful
for picking up the dulling and shining effects that are
created when animals walk across grassy surfaces.)
When following tracks (especially while you're in the
process of acquiring this skill), try to learn everything you
can about one footprint before moving on to the next. Don't be
content just to identify and follow an animal. Ask yourself
the "why" questions. "Why is this track here?" "Why is the
animal moving in this particular manner?" "Why is it headed in
this direction?"
And don't skip tracks . . . the print that could teach the most
is usually the one that you "can't" locate. You'll discover it
if you just remember that the key to the next mark is
contained in the one you're already looking at. (You may find
the clue you need to determine where and how the animal moved
next by examining — very closely — the soil
distortions or "pressure releases" in the track.)
Understand as well that you'll rarely come across a
perfect print. Most of the time, you'll see parts of tracks —
a toe or two, a heel pad perhaps — and you'll have to
visualize the rest. That's why it's so important to
familiarize yourself with classifications and patterns before
trying to read too complicated a manuscript.
In
my opinion, one of the best ways to master these basics is to
watch
an
animal make a track, and then immediately go examine the
print. That way, you'll know what the ground says (that is,
what the animal was doing) before
you read the message, and you
can memorize a wealth of different "words" and "phrases" that
will help you more easily "translate" stories later on.
Sometimes, of course, you'll look for a print and find
only creases or faint depressions in a bed of leaves. If so,
you can often carefully lift those fronds up and find perfect
tracks in the soil beneath. Remove any debris — with a pair of
tweezers — from the prints you discover before you examine
them. And use a magnifying glass often. It's much easier to
pick up dirt smudges or telltale pressure-related cracks in
the ground when your eye is looking from behind a good lens.
Since tracks are three-dimensional rather than flat,
many folks find that they're able to develop their skills by
trying to follow a trail blindfolded. Before you attempt this
exercise, familiarize your hands with the feel of visible
marks. Then gently press and probe the ground where you think
there ought to be a track but you can't see one . . . and the
sensitive parts of the fingers and palms will help you find
prints that may have deceived your eyes. Ultimately, your
hands will be able to read the ground like a book written in
braille.
Finally, you can learn a lot by simply marking each
print in a series with a popsicle stick and then connecting
the sticks with light string. The layout that results can be a
big help to you in learning an animal's pattern of movement.
(It'll also let you know when you've made a mistake and left
out a print . . . because the strides and overall pattern
should always be flowing and logical.)
AGING TRACKS
Determining the age
of a track is an art in
itself . . . and one that can be learned only through
observation and practice. The main thing to remember is that
all disturbances in the earth tend to become flat. However,
the terrain and weather can have a great effect on just how
long a track lasts. For instance, a good wind may smooth out a
depression made in dry sand within 30 seconds, but a trail
that dries into hard clay may last for weeks or months (or
more) if it's not washed out by rain. Under most conditions,
though, the peaks of a track — one made in, say, medium-hard
garden soil — will have deteriorated or rounded somewhat after
24 hours. In another day, the mark may have accumulated
debris, leaves, or pockmarks from raindrops. Eventually, as
the track crumbles and fills or is covered by other prints, it
will disappear completely.
It's often possible to get a feel for the age of an
individual track by making a thumbprint in the soil right next
to it and comparing the sharpness of the ridges. However, the
most
effective and systematic way to familiarize yourself
with the basics of track deterioration is to make several
thumbprints in an outdoor tracking box every 6 or 12 hours,
keep a record of weather changes, and note the relative
deterioration of your prints each time you return to make a
new set. You can learn to age broken or mashed vegetation by
the similar method of snapping twigs or tearing leaves . . .
and returning at regular intervals to examine them.
I
call this method "learning the wisdom of the marks" . . . with
it, you'll quickly become more proficient at aging tracks.
After a while, you should be able not only to date tracks to
within a few hours of when they were made, but also to read
stories written on the same piece of ground by different
animals at different times.
PRESERVING TRACKS
If
you'd like to make a more complete and leisurely study of a
particular footprint, you can take a plaster casting. This is
done by stirring up a honey-thick mixture of plaster of Paris
and water, pouring it into the track, and letting it set (five
or ten minutes should be long enough). To assure greater cast
strength, pour the mix until it overflows and creates a lip
around the edges. If the print is so shallow that you fear
your model may crack when you take it out, you can reinforce
the casting by adding a couple of twig "backbones" to it while
it's still wet. Remove the preserved print by carefully
digging around its edges and lifting up from below. After the
cast is completely dry, clean off debris
with a brush.
DIRT TIME
I've outlined the major skills you'll need to learn in
order to track animals, but the knowledge that can come only
with dedication and practice is more important than all the
information you can possibly gain from any article or book.
There is no substitute for dirt time . . .
for the
hours and days spent on one's hands and knees, following
prints and absorbing the secrets that only those mysterious
marks can teach. Still, no matter who you are or where you
live, you
can learn to
track by simply devoting a little time to it each day. And
once you become familiar with this new language, I think
you'll be amazed at the abundance of stories that await you .
. . many of which will begin just beyond your own back
door.
|